Brakes
Mazda Protegé5 Brake Overhaul
This is not a HOWTO guide. It is a HOWI guide. In other words, it's not how to replace your brake pads and rotors. It's how I did mine.
Disclaimer: Although this page includes a certain amount of advice, it is not intended to supplant manufacturer's instructions or actual mechanical expertise. If you have problems, you should consult an automotive professional, not my Web page. Please don't rely on this narrative in place of a qualified mechanic!
This Web page is not a tutorial on how to work on automotive brake systems. It is some text and photos that describe what I went through. It's not even a complete list of everything that needs to be done when working on brakes. This Web page alone is not enough to do the job. You need more information.
What I Did
This is the story of how I overhauled my P5's brakes. I replaced the stock components with these aftermarket parts:
- Goodrich stainless steel lines (sorry, I can't find a good link on the Web)
- Hawk brake pads
- Power Slot rotors
I also took the opportunity to paint my calipers, since they were pretty rusty and ugly.
Preliminaries
Although it took me a long time, replacing and painting brake system components is not terribly difficult, and these activities are well-documented elsewhere on the Web. This page is mostly going to be a bunch of photos showing what I went through. Sometimes it is helpful to have photos for reference. It also contains my Protegé-specific notes, which will be useful if you happen to be working on a third-generation Protegé.
Just be sure you know what you're doing when you work on your brakes. They're what make your car stop, so you want to be sure they're not messed up. Read and follow all the directions that come with the parts, and consult a professional if you're confused. I haven't documented every step here, and besides that your specific situation might be different.
The first thing to know is that brake fluid eats stuff! Certainly, it ate through my mechanic's gloves. It is also reputed to eat through paint, so keep lots of rags handy for wiping up spills.
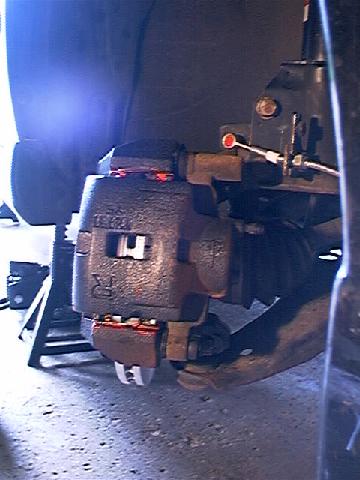
I began by jacking up the car and putting jack stands at all four corners, then I took off the wheels. I decided I was going to work on one brake at a time so that I wouldn't mix up parts between wheels. For the most part, you'll see passenger-side photos, because I used the driver's side for practice and the passenger's side for pictures.
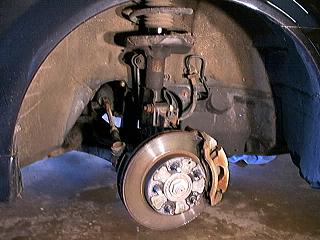
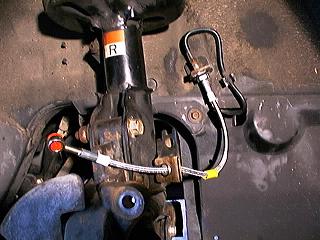
The picture above shows the front brake system as it looks with the wheel dismounted.
Front Brake Removal
I began by taking apart the front brake assembly. Since I was painting the calipers and replacing the brake lines, I took everything pretty much apart. If you're only replacing pads, though, you can dismount the caliper and pull out the pads without even disconnecting the brake lines or opening the caliper. Just make sure you have a stool or similar platform nearby to rest the caliper on as you work with it. You don't want to let it dangle from its brake line.
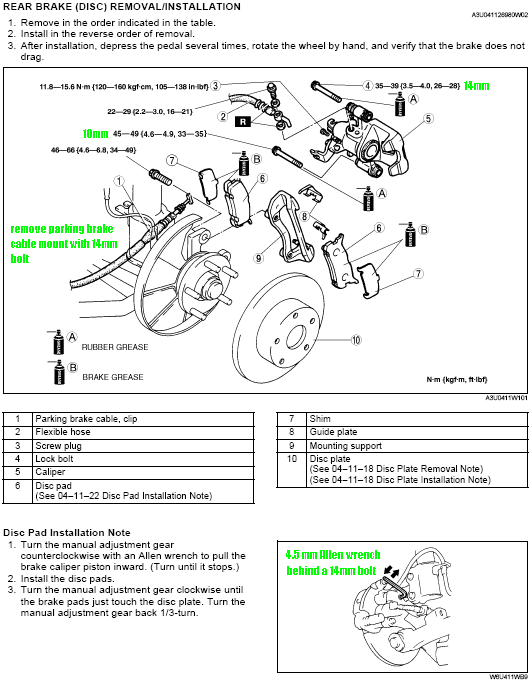
This picture, shamelessly stolen from the Mazda service manual and marked up with my notes, shows how to disassemble the front brakes.
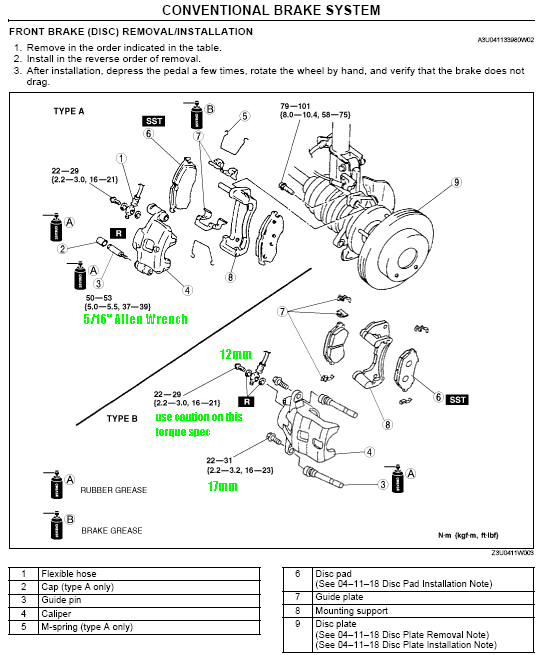
Click to embiggen
Here's a photo of some of the parts in this diagram.
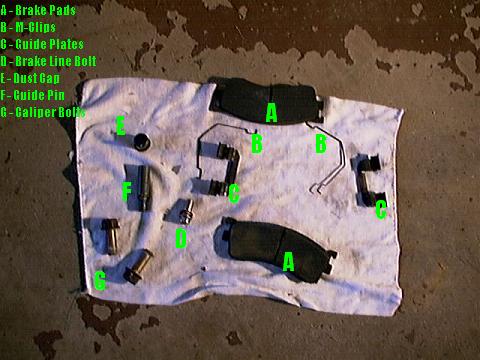
Click to embiggen
Each caliper is held on with a pair of 17mm lock bolts (G). Once the caliper is off, the rotor just slides off the lug nuts. It is not held in place except by the wheel.
The rubber brake line is held in place with a special 12mm bolt (D) that allows brake fluid to flow through it. Once this bolt comes off, the brake fluid starts flowing! I collected mine in a glass jar.
The pads (A) sit in the calipers, and the guide plates (C) fit into the calipers and provide a seat for the ends of the pads. Note! The guide plates are easy to bend during removal and reinstallation, and a bent guide plate can scrape against your rotor. It needs to be treated with care and fully seated when it is reinstalled.
The M-clips (B) are pressed in between the pads when they are installed in the caliper and push them apart when the brakes are not being applied.
The two halves of the caliper squeeze together by sliding along a pair of guide pins. One of them comes out (F), but the other stays in the caliper and acts as a hinge when you swing the caliper open. The dust cap (E) goes over the end of the guide pin to keep crud out. The guide pin has a 5/16 inch allen wrench fitting in it. I would have thought it would be metric, but 5/16 inch is what fit best for me.
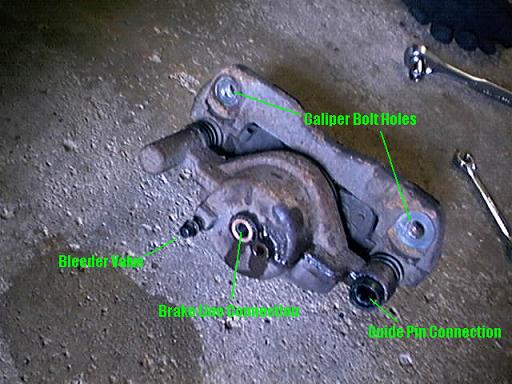
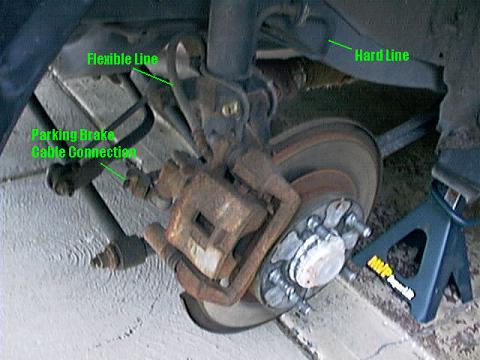
This picture shows the brake assembly from behind, before it was taken apart.
Click to embiggen
The black plastic piece near the center of the photo is the dust cap (E), and one of the lock bolts (G) is immediately below and right of the dust cap. You can also see some lovely flowers in the background.
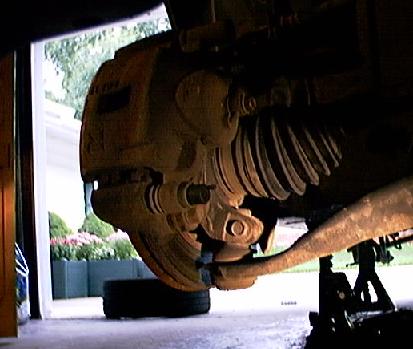
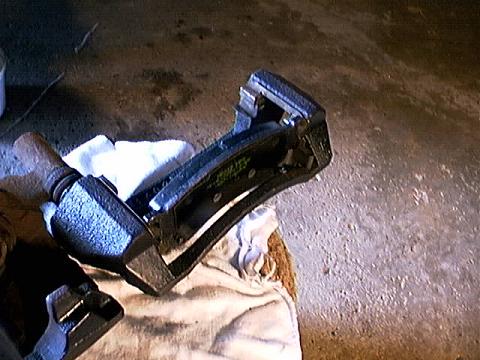
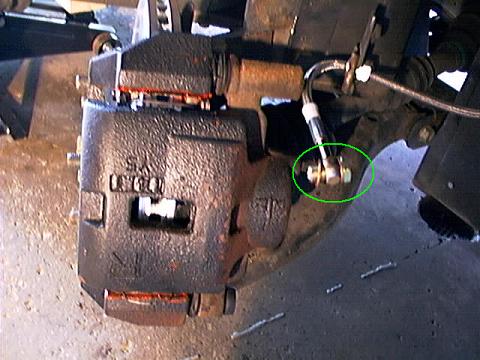
Here is a shot of the caliper once it has been removed. Notice that one guide pin comes out of the assembly while the other one is not removed. The caliper assembly swings open using one guide pin as a hinge. This allows easy access to the brake pads.
The hole to the right of the Brake Line Connection corresponds to a guide peg on the stock brake line's banjo fitting. (More info on this later.) The aftermarket banjo fittings do not have this guide peg, so the hole goes unused.
Also note the bleeder valve screw, which will be interesting at the end during the brake bleeding process.
Click to embiggen
Brake Lines
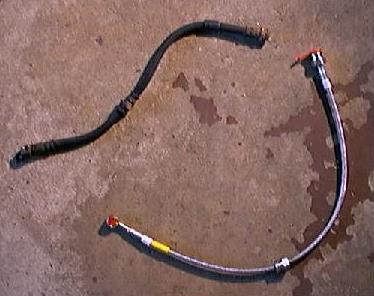
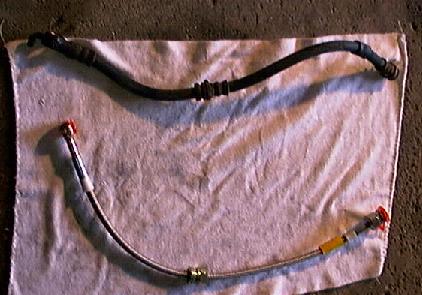
Once the caliper was off the car, I replaced the brake lines. Here are the old and new ones next to each other.
Click to embiggen
The orange things are plastic protectors that come out before installation. It's hard to see in the picture, but the fittings at the left ends of the hoses are the banjo fittings.
Note! The Goodrich kit contains two shorter lines that go in the front and two longer ones for the rear. The instructions don't mention this detail.
The brake line is divided into two parts: a "hard line" runs from the master cylinder to the wheel well. Then it is coupled to a rubber "flexible line" for the last several inches and connected to the caliper. The end of the brake line near the wheel must be flexible to accomodate wheel movement resulting from suspension travel.
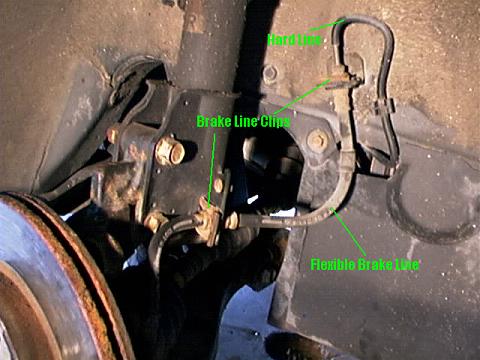
Click to embiggen
Hard lines are desirable because the brake fluid, under pressure from your foot on the pedal, squirts through them to its destination. Rubber lines are bad because the pressure of the brake fluid will be partially spent pushing the elastic walls of the brake line outward instead of causing the caliper piston to press the pads against the caliper.
Braided steel brake lines are an improvement over the stock rubber lines, because the normal rubber lines are sheathed in a flexible, braided stainless steel covering. This permits the necessary flexibility while reducing the amount of deformation of the hose walls when the brake fluid travels through them. The result is a tighter, more accurate pedal action, which is especially noticable during hard braking.
Removing the rubber lines is pretty easy; it's just a matter of unscrewing a bolt at each end and removing the metal clips that hold the line in place. Installing the steel lines reverses the process. The only problem I encountered was twisting the head off one of the bolts that holds the brake line to the caliper, because the torque specs that came with the brake lines were way too high (something like 20 lb-ft.).
Click to embiggen
The fitting on the caliper end of the brake line is called a banjo fitting, and the bolt that goes through it (the one that I overtorqued) is actually pretty cool. It has a hole running along its length and another one drilled perpendicular to that. The banjo fitting has a similar pair of holes, so that fluid can flow out of the fitting, through the bolt, and into the caliper.
One other note: the stock banjo fitting has a hook that fits into a hole on the caliper. That keeps it from rotating as the bolt is tightened. The Goodrich brake line lacks that feature, so it needs to be held in place by hand.
Here is the shiny new line in place, waiting to be attached on the caliper side.
Meanwhile, the calipers have been removed from the car are are waiting to get gussied up.
It's worth mentioning that the steel cables need to be adjusted once they are installed so that they don't rub against the suspension or body as the suspension travels up and down. The line can be pulled either direction through the central clip to adjust the amount of slack on either side of the clip. If the brake line rubs against anything as the suspension flexes, it could fail prematurely, and it certainly produces an irksome noise.
With the wheel off and the car on stands, it is difficult to tell if the line will rub, so it's important to listen for the noise while driving.
Painting the Calipers
I don't know about your calipers, but mine are a disaster. They're cruddy and rusty and look a fright. I decided that -- while I had everything torn apart -- I'd attempt to make them look better with some black paint. Here's the "before" shot:

Click to embiggen
I scraped off as much dirt and loose rust as I could with a wire brush, then I primed it with a couple coats of rust-stopping primer. This involved masking off the non-metal parts with tape and newspaper and balancing the calipers in awkward positions so that I could hit them from every angle. It was a chore.
Then it was the same story all over again with several coats of black paint. It would have been smart to paint all four calipers at once so they could dry while other work was being done, but I wasn't smart. I was doing one wheel at a time, so I spent a lot of time waiting for paint to dry. (Is it stupid in here? Or is it just me?)
Sorry. No pictures of the painting process, but you can imagine what that was like. Some of the shots later on show the painted calipers.
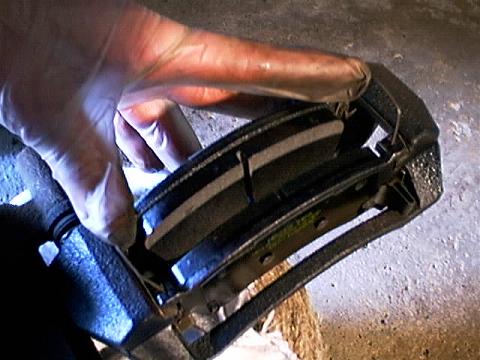
New Pads
I admit it. The only part of this project that really needed done was replacing the brake pads, but I couldn't resist doing everything at once.
Interestingly enough, it was really only the inside pads on the front wheels that showed any wear. The outside front pads and all the rear pads were still looking good, even after 50,000 miles.
Installing the new pads should have been straightforward, but it took me a long time to get them lined up properly and have them stay in place as I worked with the other pad, and so forth.
Here's one pad in. The caliper is hinged open along one guide pin, and the outside pad has been installed.
Click to embiggen
Notice the metal guide clips at either end of the brake pad. I think you get a new pair of these guys if you buy the OEM pads from Mazda, but I was using Hawk pads, and they didn't come with replacement clips. This means the old clips need to be pampered when being removed and re-installed, because if they bend, they will rub up against the rotor and make a squeaking sound. They'll also cut a gouge into the rotor. And none of that is good news.
I had such a problem with one of my clips, and I had to remove the caliper and file down the clip so that it wasn't touching the rotor any more. I hope that as the pad wears down I don't run into the problem again, but we'll see how that goes.
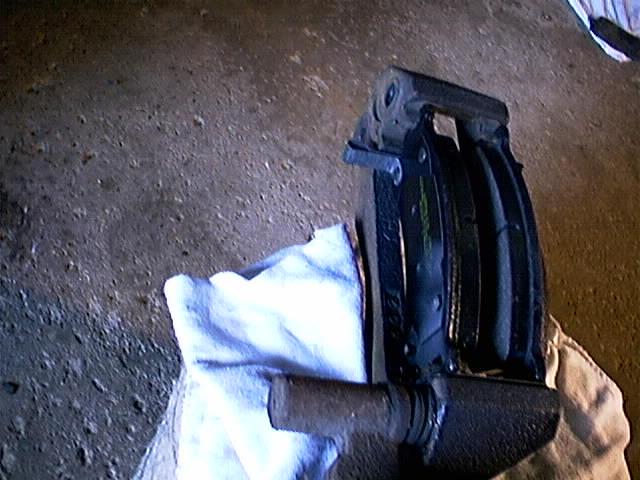
Like a hotdog in a bun, here are both pads in the caliper.
Click to embiggen
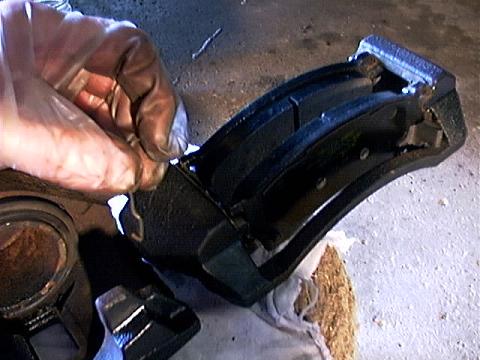
The next step is to run a bead of brake grease down the outside of each pad, just like ketchup and mustard. (The grease is not shown in the photo, but it would go right where the yellow printing is.) The grease keeps the pads from making noise as they shift around in the caliper under braking. The shop manual indicates all the places where grease belongs.
With the caliper still hinged open, it is time to install the M-clips.
Click to embiggen
As near as I can tell, these are springs that force the pads apart when you've lifted your foot from the brake pedal. Like the guide clips, I believe you get new ones if you buy the pad kit from Mazda, but Hawk does not supply them.
Note the circular shape on the left of the photo above. This is the piston that is pushed outward by the brake fluid when the driver presses the brake pedal. Note that it is not flush with the surrounding assembly. More on this in a moment.
First, here's what it looks like with both M-clips installed.
Click to embiggen
Ahh. Cliptacular.
When brake pads are new, they're nice and thick, but as they wear down, they get thinner by several millimeters. Pads that are right next to the rotor when they're new would be several millimeters away from the rotor by the end of their life, if they returned to the same "open" position each time the pedal was released. That would be undesirable, because the driver would surely notice the time it took for the pads to travel those few millimeters before they started to grab the rotor.
Luckily, the pads don't return to the same position each time the brake pedal is released. Their surface is always the same distance from the surface of the rotor, even as the pads wear down and become thinner. But this means the "open" position of the brake piston is higher when the pads are worn out than when they are new.
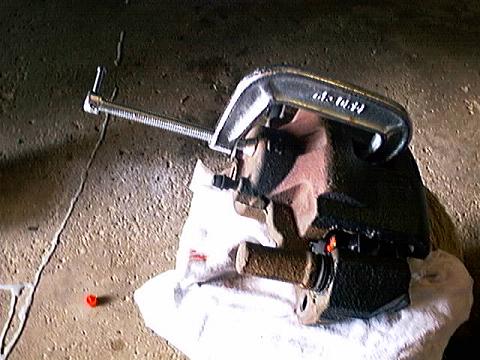
At this point in the process, we have replaced the old, thin pads with chubby new ones, and the piston, in its "thin pad", extended position is taking up space that will now be occupied by the new pad! The solution is to squeeze the piston back into its "thick pad" position.
The first thing to do is to close the caliper back up. Next, a C-clamp is positioned in the slot on the top of the caliper and tightened down. The C-clamp squeezes the pad against the piston and back into place. This gives it enough clearance to fit around the rotor.
Click to embiggen
Now, the end of my C-clamp that's supposed to fit in the slot was about an eighth of an inch too fat to get in the hole, so the rotary tool had to make an appearance to grind its girth into compliance. If you're a Mazda dealership, you have a special tool that spreads the pads without any trouble.
That's it for the pads, but the calipers can't be bolted back on to the car until the rotors have been replaced.
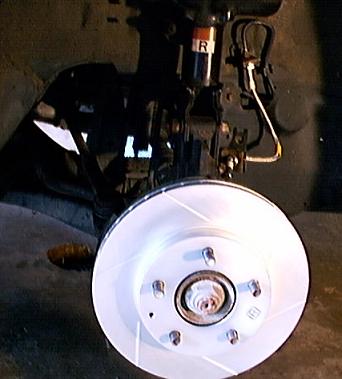
New Rotors
Installing rotors is easy if the wheels and brake calipers are off. The rotors are not held on by anything except the wheels being bolted on, so the old ones come right off (with a couple of love taps to break the rust), and the new ones slip right on.
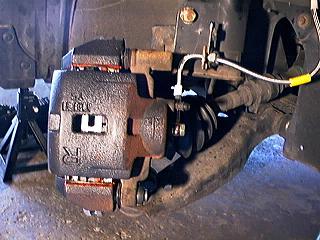
Then the freshly-painted caliper can be bolted on.
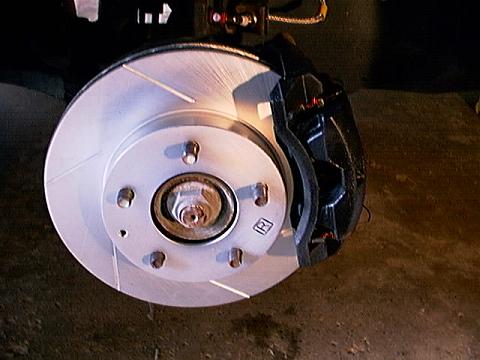
Click to embiggen
Here's another shot of the caliper in place. Note the banjo fitting for the steel brake line waiting to be attached.
Here's the banjo fitting before it is tightened down.
Click to embiggen
And here it is, all tightened down.
Now the guide pin can be tightened and the dust cap can be replaced.
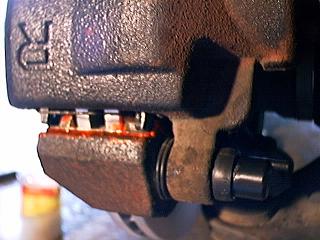
In the picture above, note the red brake grease betweent he guide clip and the caliper.
Now it's time to move on to the rear brakes.
Rear Brakes
The rear brakes are much the same as the front brakes in terms of installing the pads, brake lines, and rotors, with one exception: the parking brake. There is a cable that connects the brake handle to both rear calipers and must be removed in order to work on the rear brakes. Also, an allen nut needs to be adjusted to control the piston's resting position.
To begin with, here is the page from Mazda's shop manual with my notes.
Click to embiggen
There are a pair of 14mm bolts on the rear caliper. One holds the parking brake cable in place, and it must be removed in order to get the calipers off. The other one covers a bolt with a 4.5mm allen wrench fitting. Turning the allen bolt moves the rear brake piston in and out.
Whereas the front brake piston needed the help of a C-clamp to return to its fully retracted position, the rear brakes can be opened by turning the allen bolt. However, it is important to return the rear piston to the proper position by tightening this bolt once the new pads are installed. If the piston isn't in the right position, the pads won't hit the rotor, so the rear brakes won't do any work. It also means that the parking brake will not engage!
The manual says to tighten the bolt until the pads touch the rotor, then back of a third of a turn. It's hard to determine when the pads are touching the rotor, but with the car on jack stands, it is possible to turn the rear wheels by hand and listen for when they start to scrape.
It's possible that the parking brake may need to be adjusted even when the bolt is properly tightened. There is an adjustment bolt under the plastic next to the parking brake handle that can be turned to adjust the parking brake's engagement point.
I recommend adjusting the allen bolt with the parking brake off, then applying the parking brake to see if it engages. If it doesn't engage at all, the allen bolt probably needs to be tightened more. If it engages with the handle too high or too low, it can be fine-tuned with the adjustment screw. It's important that the calipers be sufficiently tight when the parking brake is on, but that the wheels turn freely with the parking brake off.
Here is a picture of the rear brake assembly.
Click to embiggen
Bleeding and Bedding
Two important steps that aren't covered here are bleeding and bedding the brakes.
Liquids, such as brake fluid, can not be compressed (much). This is why it squirts through the brake lines and moves the piston in the caliper when the driver presses the pedal. Gasses, such as air, can be compressed, and if there is air in the brake lines, the motion of the brake pedal will be soaked up by the air being compressed. The fluid won't move through the lines. The piston won't squeeze the pads against the rotor. The car won't stop.
Don't ever drive a car that has air in the brake lines, and if the brake lines have been removed, as they have in these photos, there is air in the lines.
Little screws on the back of each caliper can be opened to let the air (and some brake fluid) out of the system while a buddy presses the brake pedal. There's a systematic way to do this, though, that guarantees you get all or almost all the air out. These steps are outside the scope of this Web page, but they need to be done.
Another installation step is the bedding process. New brake pads have a finished surface that doesn't grab the rotors well. Brake pads come with a list of instructions to follow the first few times a car is stopped with new pads. This scrapes off the finished surface and mates the pad material perfectly with the surface of the rotor. Until brakes are properly bedded, they won't provide full stopping power.
The steps for doing this are also beyond the scope of this Web page, but it is important to discover and follow them before relying on the stopping ability of new pads.

